> ## Documentation Index
> Fetch the complete documentation index at: https://docs.vms.verolabs.co/llms.txt
> Use this file to discover all available pages before exploring further.
# Setup guideline VMS agent collector
> Hướng dẫn triển khai agent bằng script và cấu hình probe monitor
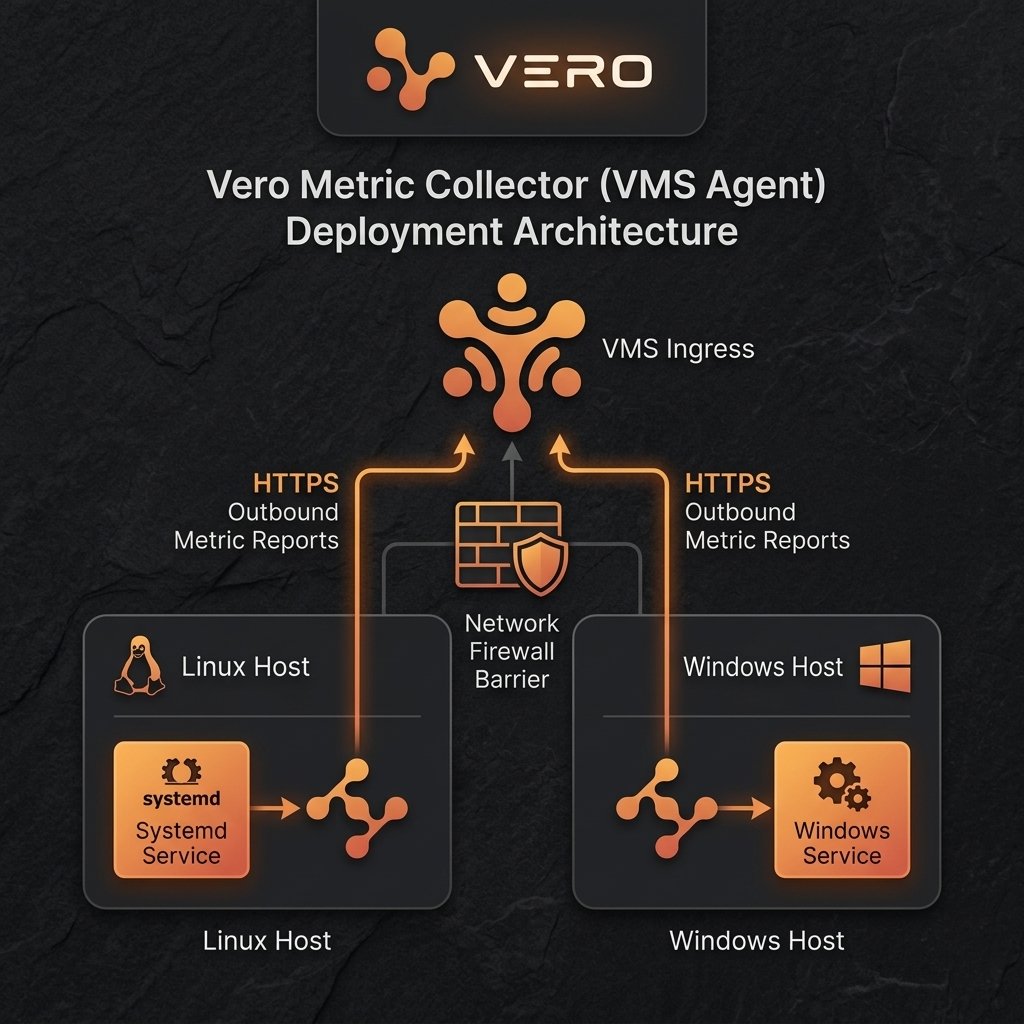
VMS agent collector chạy trên host khách hàng để thu thập metrics, checks và logs, sau đó gửi về VMS Master qua HTTPS.
## Mô hình hoạt động của Agent
 ***
## Các đầu mục chuẩn bị (Agent)
| Đầu mục | Yêu cầu chuẩn bị |
| ------- | -------------------------------- |
| OS | **Linux** hoặc **Windows** |
| Kết nối | Outbound HTTPS tới `INGRESS_URL` |
***
## Quy trình triển khai trên Linux
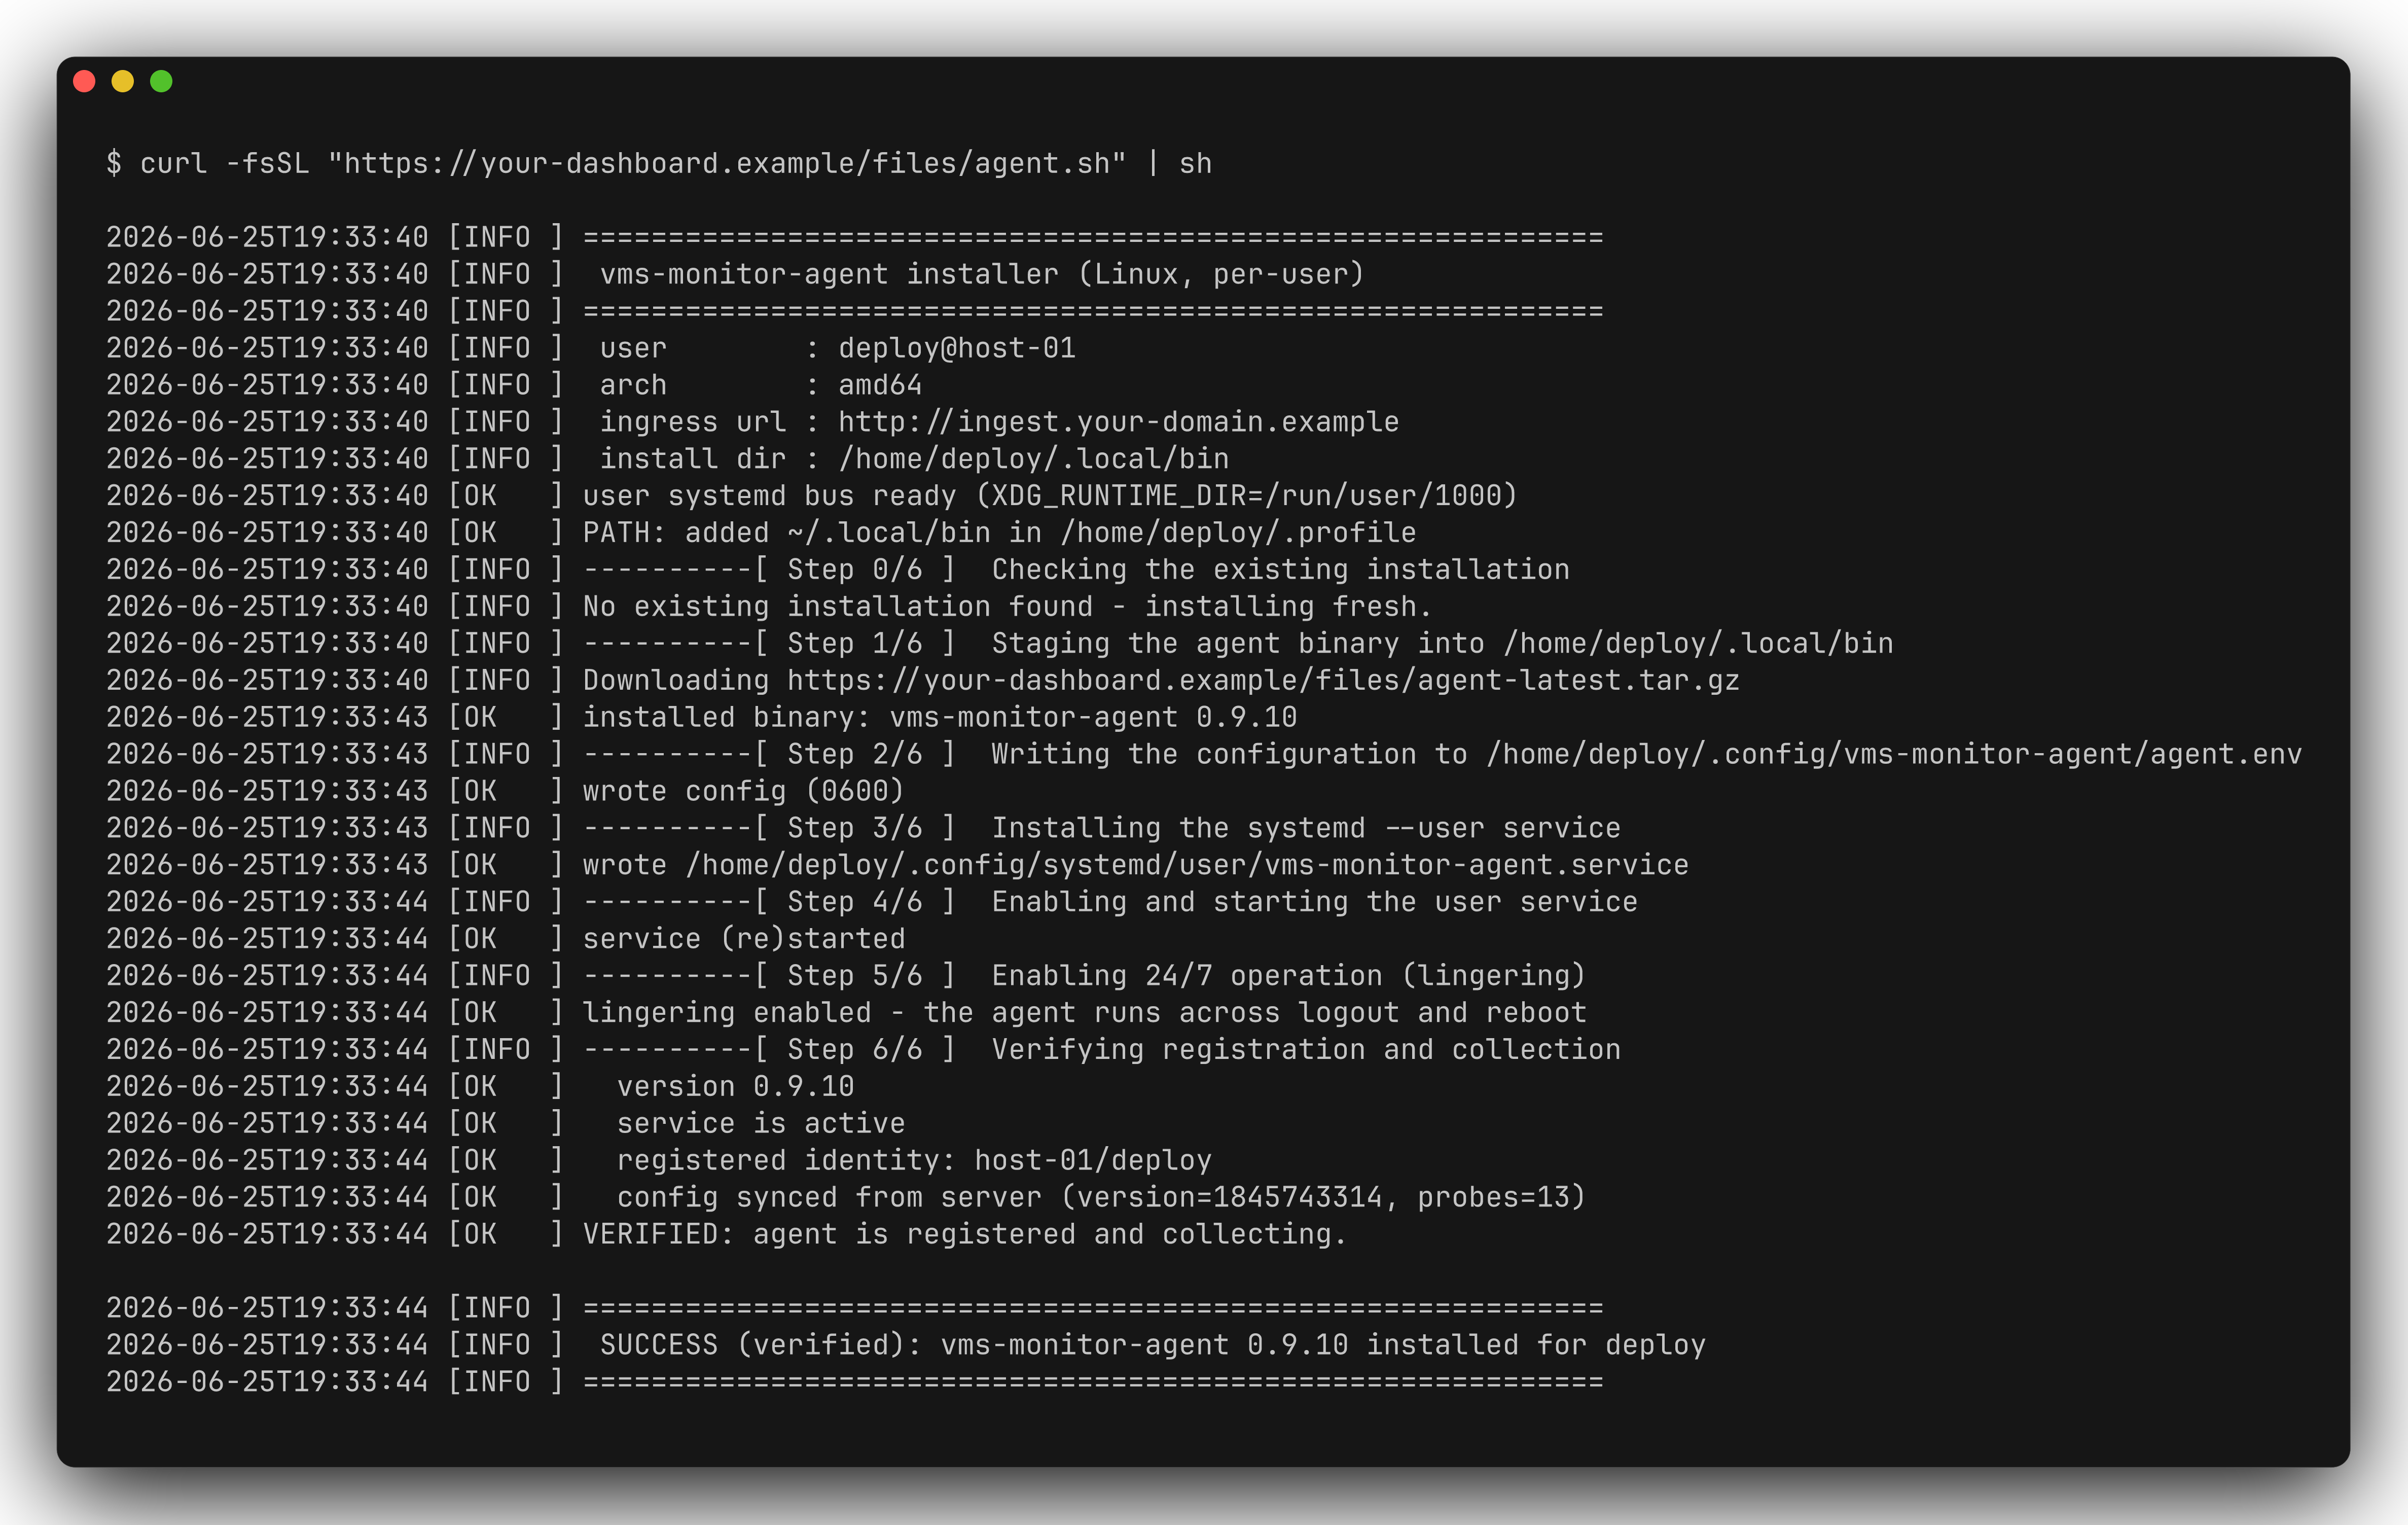
* **Step**: Trên host cần giám sát, chạy script (không cần sudo):
```bash theme={null}
curl -fsSL "" | sh
```
* **Check**: Script in tiến trình `Step 1/6 ... 6/6`.
* **Result**: `SUCCESS (verified): vms-monitor-agent installed`.
***
## Các đầu mục chuẩn bị (Agent)
| Đầu mục | Yêu cầu chuẩn bị |
| ------- | -------------------------------- |
| OS | **Linux** hoặc **Windows** |
| Kết nối | Outbound HTTPS tới `INGRESS_URL` |
***
## Quy trình triển khai trên Linux
* **Step**: Trên host cần giám sát, chạy script (không cần sudo):
```bash theme={null}
curl -fsSL "" | sh
```
* **Check**: Script in tiến trình `Step 1/6 ... 6/6`.
* **Result**: `SUCCESS (verified): vms-monitor-agent installed`.
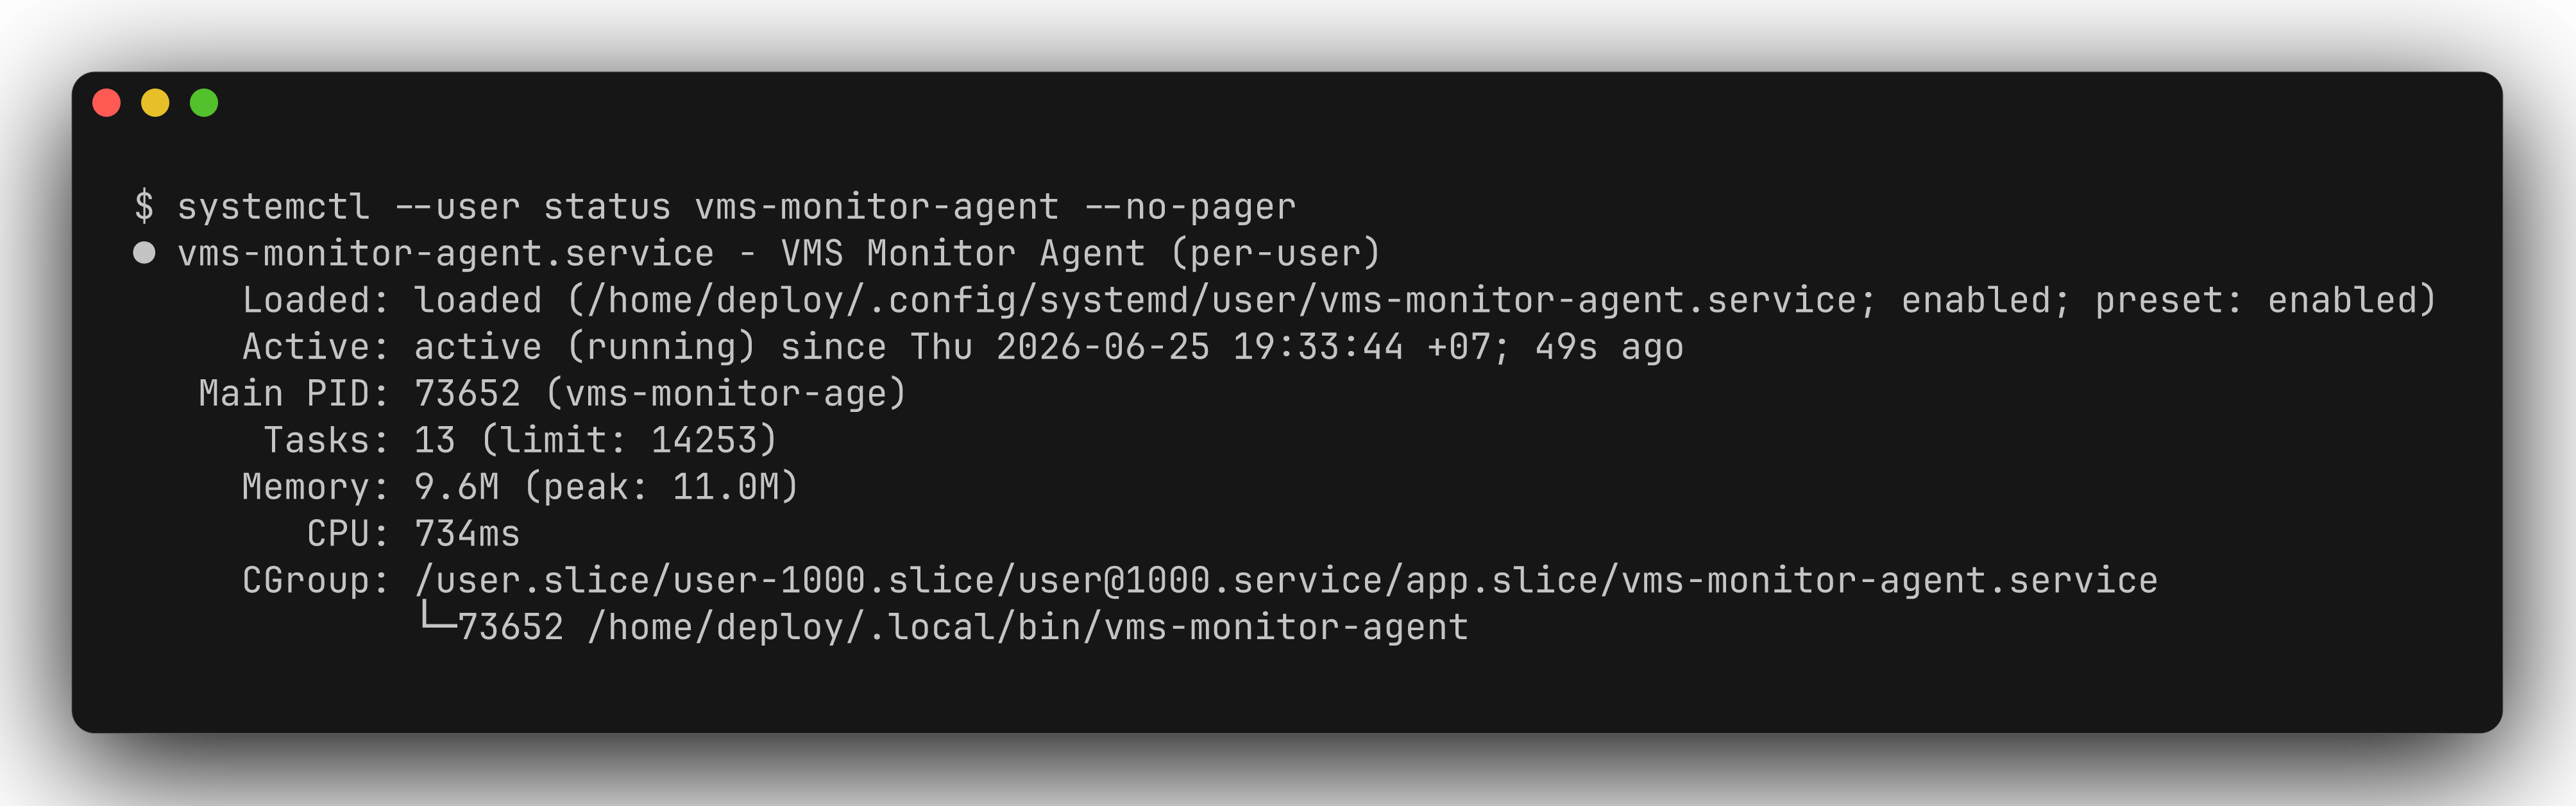
 * **Step**: Xem trạng thái service:
```bash theme={null}
systemctl --user status vms-monitor-agent --no-pager
```
* **Check**: Trạng thái hiển thị `active (running)`.
* **Result**: Binary tại `~/.local/bin/vms-monitor-agent`, config tại `~/.config/vms-monitor-agent/agent.env`.
* **Step**: Xem trạng thái service:
```bash theme={null}
systemctl --user status vms-monitor-agent --no-pager
```
* **Check**: Trạng thái hiển thị `active (running)`.
* **Result**: Binary tại `~/.local/bin/vms-monitor-agent`, config tại `~/.config/vms-monitor-agent/agent.env`.
 * **Step**: Xem log thời gian thực:
```bash theme={null}
journalctl --user -u vms-monitor-agent -f
```
* **Check**: Tìm dòng log `agent started` kèm `agentKey`, `probes`, `configVersion`.
* **Result**: Log dạng JSON xuất hiện, ví dụ:
```json theme={null}
{"level":"INFO","msg":"agent started","agentKey":"web-01/appuser","configVersion":12,"probes":8}
```
* **Step**: Xem log thời gian thực:
```bash theme={null}
journalctl --user -u vms-monitor-agent -f
```
* **Check**: Tìm dòng log `agent started` kèm `agentKey`, `probes`, `configVersion`.
* **Result**: Log dạng JSON xuất hiện, ví dụ:
```json theme={null}
{"level":"INFO","msg":"agent started","agentKey":"web-01/appuser","configVersion":12,"probes":8}
```
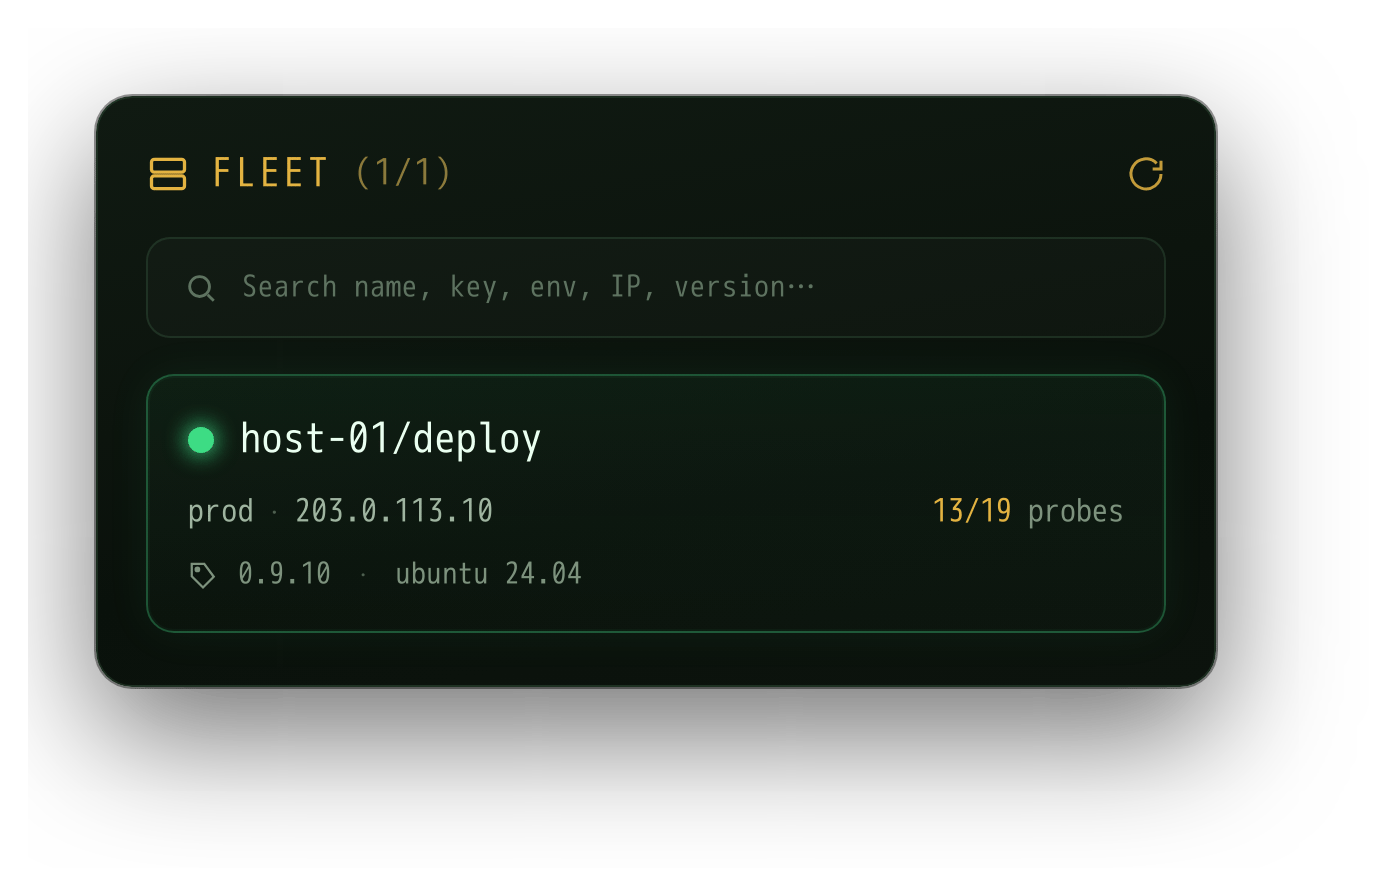
 Sau khi cài xong, agent hiện trong **Agent Config (FLEET)** trên Dashboard (`https:///dashboards/agent-config`):
 ***
## Quy trình triển khai trên Windows
* **Step**: Mở PowerShell (không cần quyền Administrator):
```powershell theme={null}
irm "" | iex
```
* **Check**: Script in tiến trình `Step 1/6 ... 6/6`.
* **Result**: `SUCCESS (verified): vms-monitor-agent installed`.
* **Step**: Kiểm tra task auto-start và tiến trình agent:
```powershell theme={null}
Get-ScheduledTask -TaskName vms-monitor-agent
Get-Process vms-monitor-agent
```
* **Check**: Task tồn tại và có process agent đang chạy.
* **Result**: Binary tại `%LOCALAPPDATA%\vms-monitor-agent\vms-monitor-agent.exe`.
* **Step**: In phiên bản:
```powershell theme={null}
& "$env:LOCALAPPDATA\vms-monitor-agent\vms-monitor-agent.exe" version
```
* **Check**: In ra version, commit và build date.
* **Result**: Agent đang online trên Dashboard.
***
## Quản lý agent bằng dòng lệnh
Sau khi cài, mở **terminal/PowerShell mới** và dùng lệnh `vms-monitor-agent` (không cần `sudo`/Administrator).
| Lệnh | Tác dụng |
| ----------------------------- | -------------------------------------------------------------- |
| `vms-monitor-agent status` | Xem trạng thái: đã cài / đang chạy / auto-start / version |
| `vms-monitor-agent start` | Khởi động và bật tự chạy lại khi đăng nhập/khởi động máy |
| `vms-monitor-agent stop` | Dừng **hẳn** và tắt auto-start — agent **sẽ không tự dậy lại** |
| `vms-monitor-agent restart` | Khởi động lại, giữ nguyên auto-start |
| `vms-monitor-agent uninstall` | Tự gỡ agent (thêm `--purge` để xoá cả state) |
| `vms-monitor-agent version` | In version, commit, build date |
| `vms-monitor-agent help` | In hướng dẫn sử dụng đầy đủ |
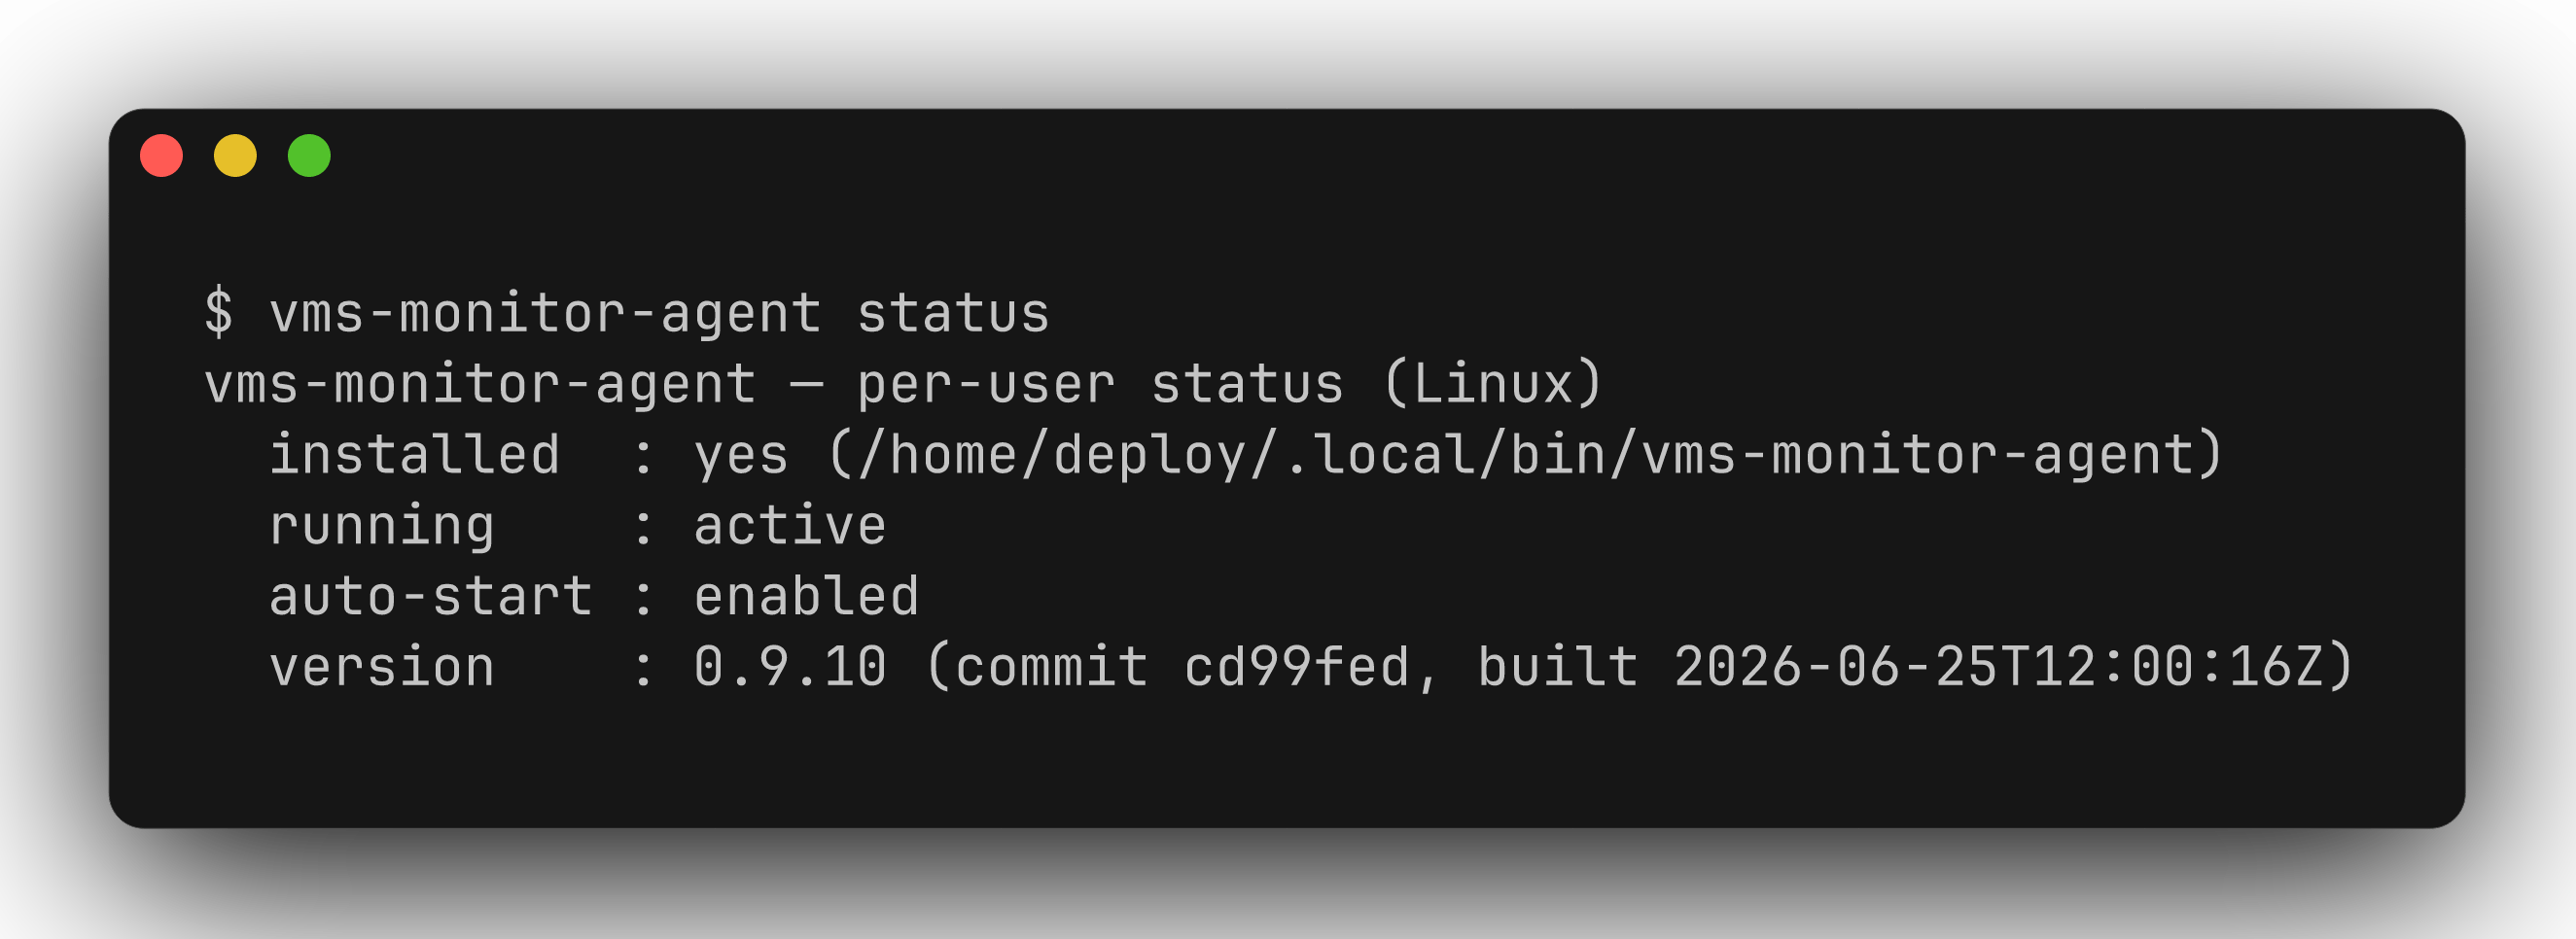
Lệnh `status` cho biết agent đã cài / đang chạy / auto-start / version:
***
## Quy trình triển khai trên Windows
* **Step**: Mở PowerShell (không cần quyền Administrator):
```powershell theme={null}
irm "" | iex
```
* **Check**: Script in tiến trình `Step 1/6 ... 6/6`.
* **Result**: `SUCCESS (verified): vms-monitor-agent installed`.
* **Step**: Kiểm tra task auto-start và tiến trình agent:
```powershell theme={null}
Get-ScheduledTask -TaskName vms-monitor-agent
Get-Process vms-monitor-agent
```
* **Check**: Task tồn tại và có process agent đang chạy.
* **Result**: Binary tại `%LOCALAPPDATA%\vms-monitor-agent\vms-monitor-agent.exe`.
* **Step**: In phiên bản:
```powershell theme={null}
& "$env:LOCALAPPDATA\vms-monitor-agent\vms-monitor-agent.exe" version
```
* **Check**: In ra version, commit và build date.
* **Result**: Agent đang online trên Dashboard.
***
## Quản lý agent bằng dòng lệnh
Sau khi cài, mở **terminal/PowerShell mới** và dùng lệnh `vms-monitor-agent` (không cần `sudo`/Administrator).
| Lệnh | Tác dụng |
| ----------------------------- | -------------------------------------------------------------- |
| `vms-monitor-agent status` | Xem trạng thái: đã cài / đang chạy / auto-start / version |
| `vms-monitor-agent start` | Khởi động và bật tự chạy lại khi đăng nhập/khởi động máy |
| `vms-monitor-agent stop` | Dừng **hẳn** và tắt auto-start — agent **sẽ không tự dậy lại** |
| `vms-monitor-agent restart` | Khởi động lại, giữ nguyên auto-start |
| `vms-monitor-agent uninstall` | Tự gỡ agent (thêm `--purge` để xoá cả state) |
| `vms-monitor-agent version` | In version, commit, build date |
| `vms-monitor-agent help` | In hướng dẫn sử dụng đầy đủ |
Lệnh `status` cho biết agent đã cài / đang chạy / auto-start / version:
 Minh hoạ `stop` (dừng hẳn) rồi `start` lại — chú ý `running` và `auto-start` đổi trạng thái theo:
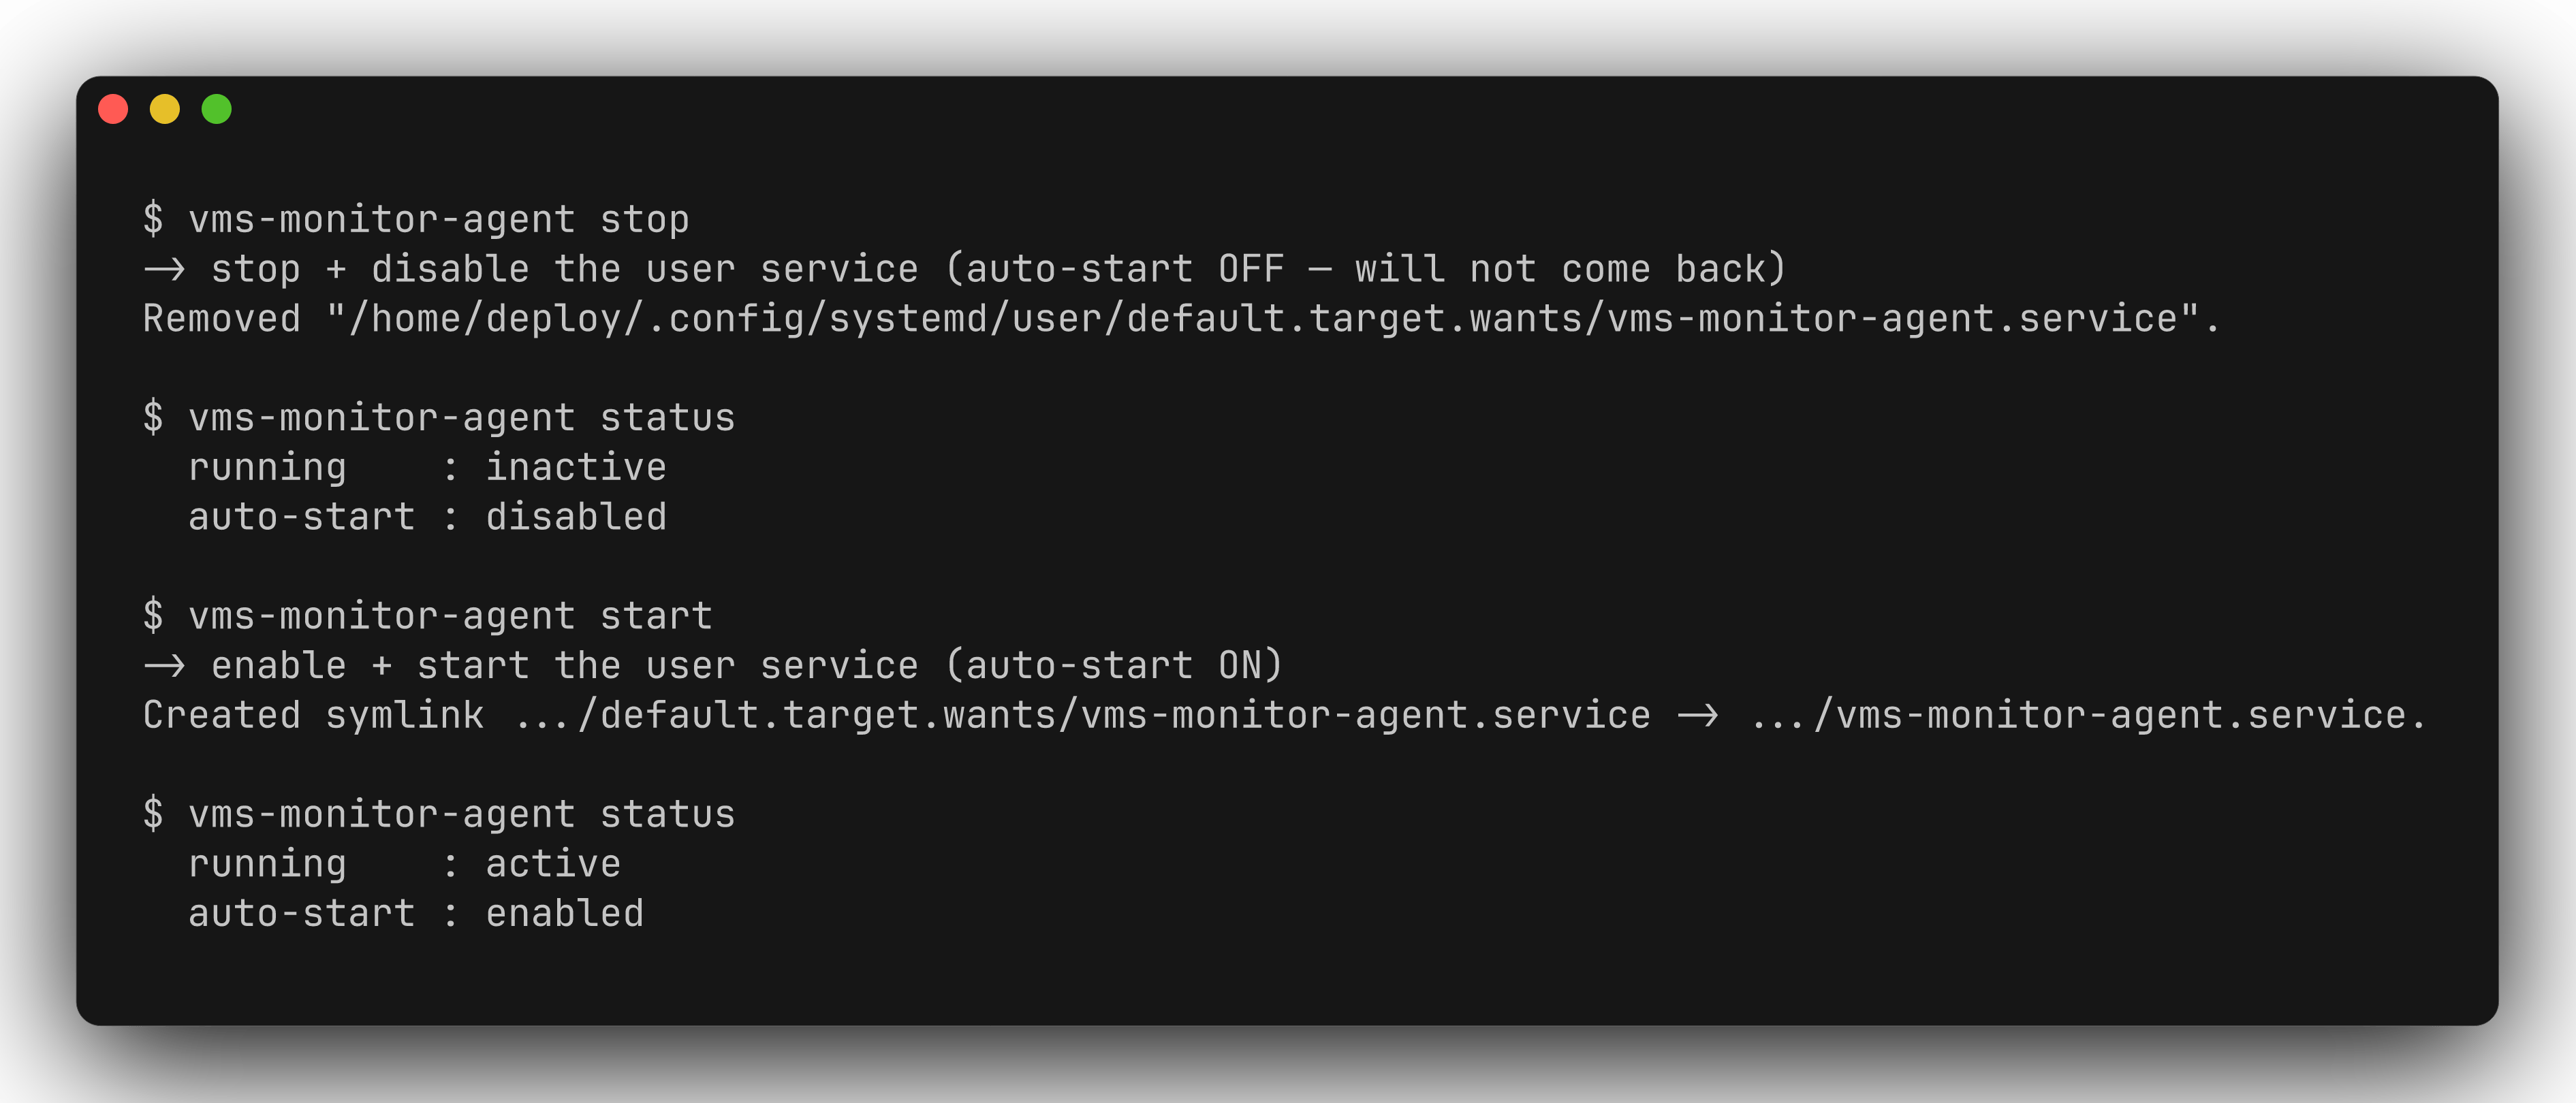 **`stop` là dừng hẳn**: dừng tiến trình và tắt auto-start. Agent **không tự chạy lại sau reboot**. Dùng `start` để chạy lại hoặc `uninstall` để gỡ.
Nếu gặp `command not found`, mở shell mới hoặc dùng đường dẫn đầy đủ (`~/.local/bin/vms-monitor-agent` trên Linux, `%LOCALAPPDATA%\vms-monitor-agent\vms-monitor-agent.exe` trên Windows).
***
## Cập nhật agent
Chạy lại lệnh cài đặt:
* **Linux**:
```bash theme={null}
curl -fsSL "" | sh
```
Script so sánh phiên bản và hỏi trước khi thay binary.
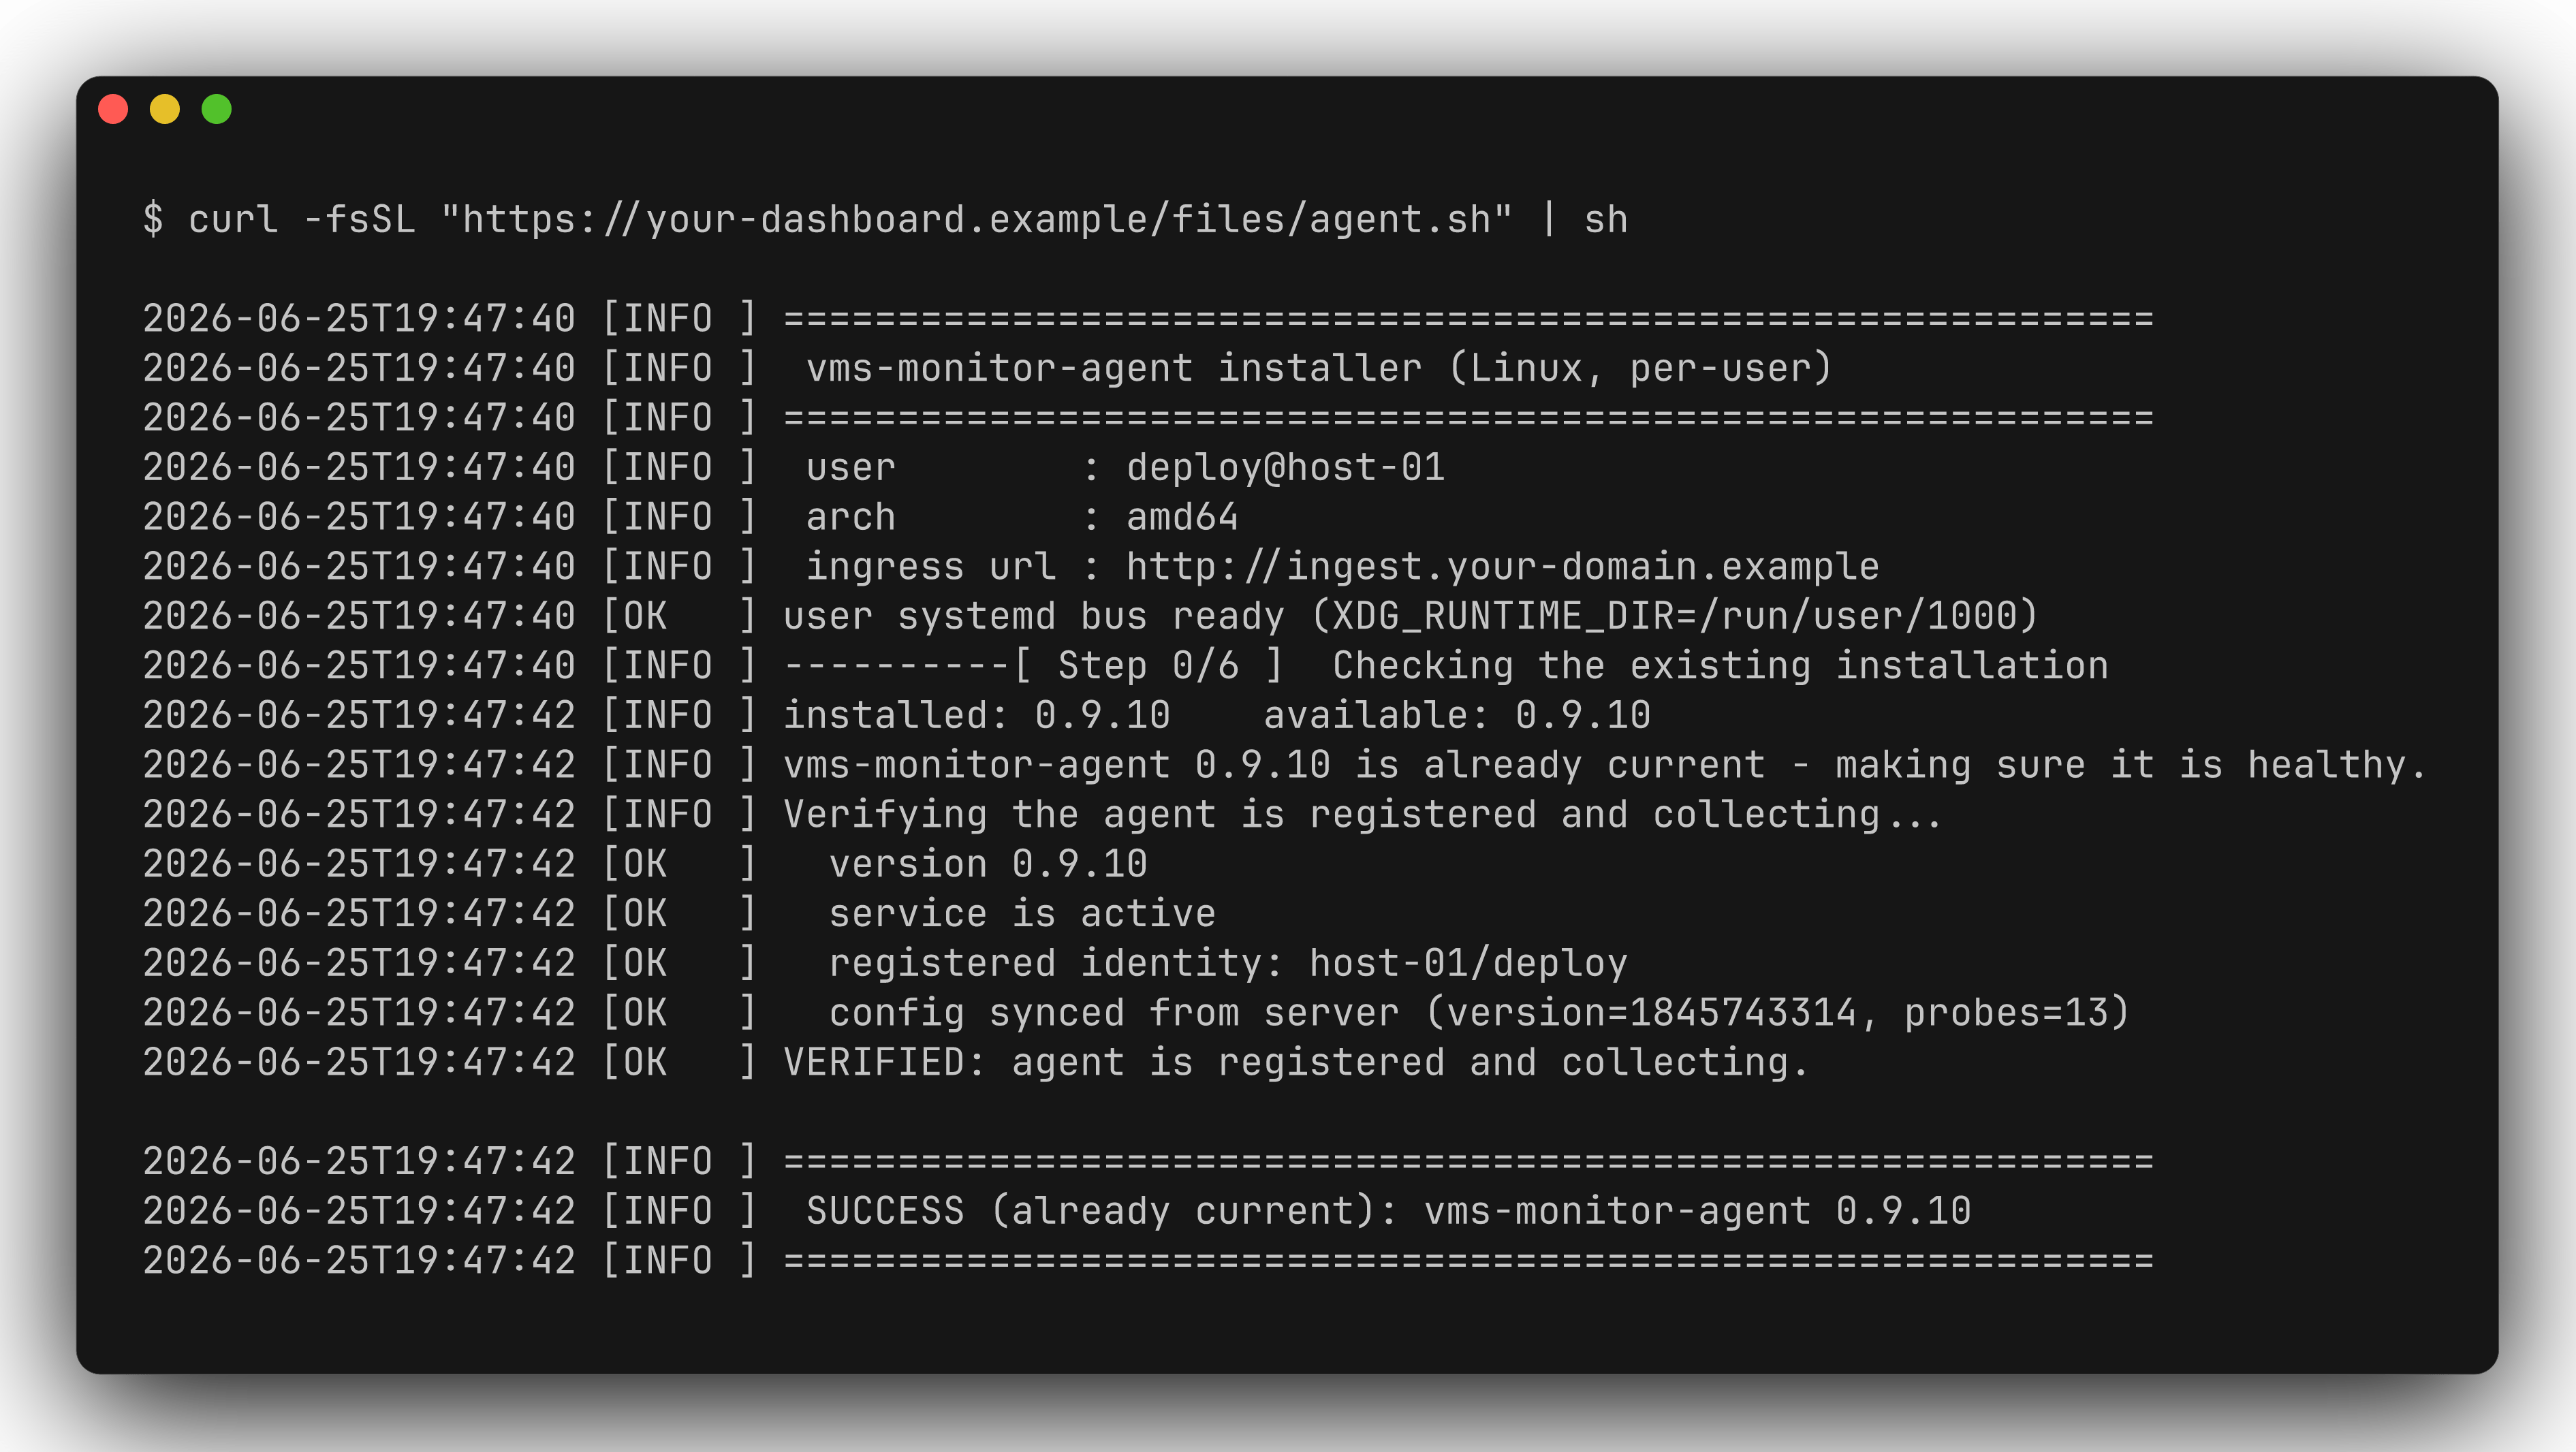
Nếu đã ở bản mới nhất, script báo `already current`:
**`stop` là dừng hẳn**: dừng tiến trình và tắt auto-start. Agent **không tự chạy lại sau reboot**. Dùng `start` để chạy lại hoặc `uninstall` để gỡ.
Nếu gặp `command not found`, mở shell mới hoặc dùng đường dẫn đầy đủ (`~/.local/bin/vms-monitor-agent` trên Linux, `%LOCALAPPDATA%\vms-monitor-agent\vms-monitor-agent.exe` trên Windows).
***
## Cập nhật agent
Chạy lại lệnh cài đặt:
* **Linux**:
```bash theme={null}
curl -fsSL "" | sh
```
Script so sánh phiên bản và hỏi trước khi thay binary.
Nếu đã ở bản mới nhất, script báo `already current`:
 * **Windows**:
```powershell theme={null}
irm "" | iex
```
***
## Gỡ cài đặt agent
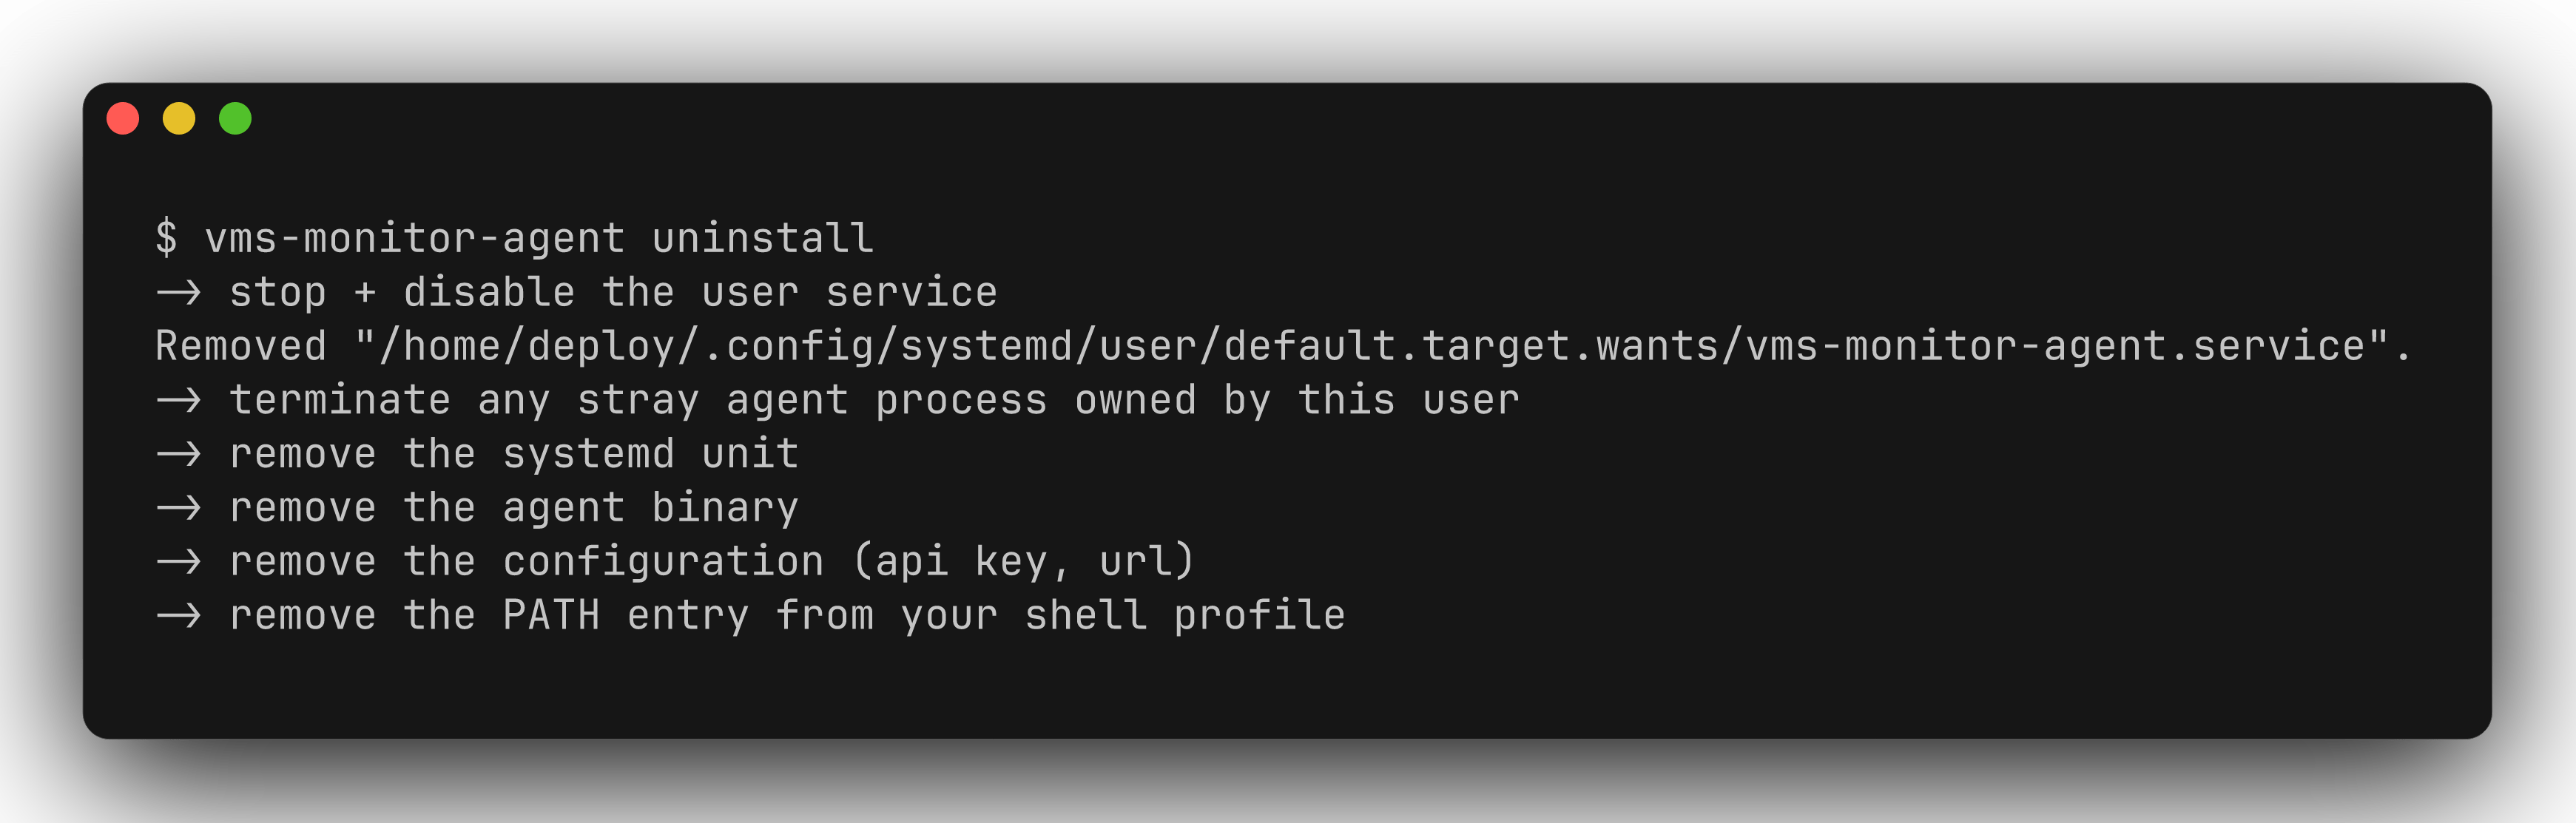
Chạy `uninstall` từ binary, hoặc tải lại script kèm `uninstall`:
* **Linux**:
```bash theme={null}
# Gỡ ngay trên máy bằng binary; thêm --purge để xoá cả state:
vms-monitor-agent uninstall
# Hoặc, nếu host chưa có lệnh này, tải lại script:
curl -fsSL "" | sh -s -- uninstall
```
* **Windows**:
```powershell theme={null}
irm "" | iex
```
***
## Gỡ cài đặt agent
Chạy `uninstall` từ binary, hoặc tải lại script kèm `uninstall`:
* **Linux**:
```bash theme={null}
# Gỡ ngay trên máy bằng binary; thêm --purge để xoá cả state:
vms-monitor-agent uninstall
# Hoặc, nếu host chưa có lệnh này, tải lại script:
curl -fsSL "" | sh -s -- uninstall
```
 * **Windows**:
```powershell theme={null}
# Gỡ ngay trên máy bằng binary; thêm --purge để xoá cả thư mục cài:
vms-monitor-agent uninstall
# Hoặc tải lại script:
& ([scriptblock]::Create((irm ""))) uninstall
```
***
## Troubleshooting thường gặp
| Triệu chứng | Nguyên nhân thường gặp | Cách xử lý |
| --------------------- | -------------------------- | -------------------------------------------- |
| Agent start fail ngay | Thiếu ingress URL/API key | Kiểm tra log agent để xem lỗi chi tiết |
| `401`/auth blocked | API key sai hoặc bị rotate | Lấy key mới từ VMS Master và chạy lại script |
* **Windows**:
```powershell theme={null}
# Gỡ ngay trên máy bằng binary; thêm --purge để xoá cả thư mục cài:
vms-monitor-agent uninstall
# Hoặc tải lại script:
& ([scriptblock]::Create((irm ""))) uninstall
```
***
## Troubleshooting thường gặp
| Triệu chứng | Nguyên nhân thường gặp | Cách xử lý |
| --------------------- | -------------------------- | -------------------------------------------- |
| Agent start fail ngay | Thiếu ingress URL/API key | Kiểm tra log agent để xem lỗi chi tiết |
| `401`/auth blocked | API key sai hoặc bị rotate | Lấy key mới từ VMS Master và chạy lại script |